 AtticShield

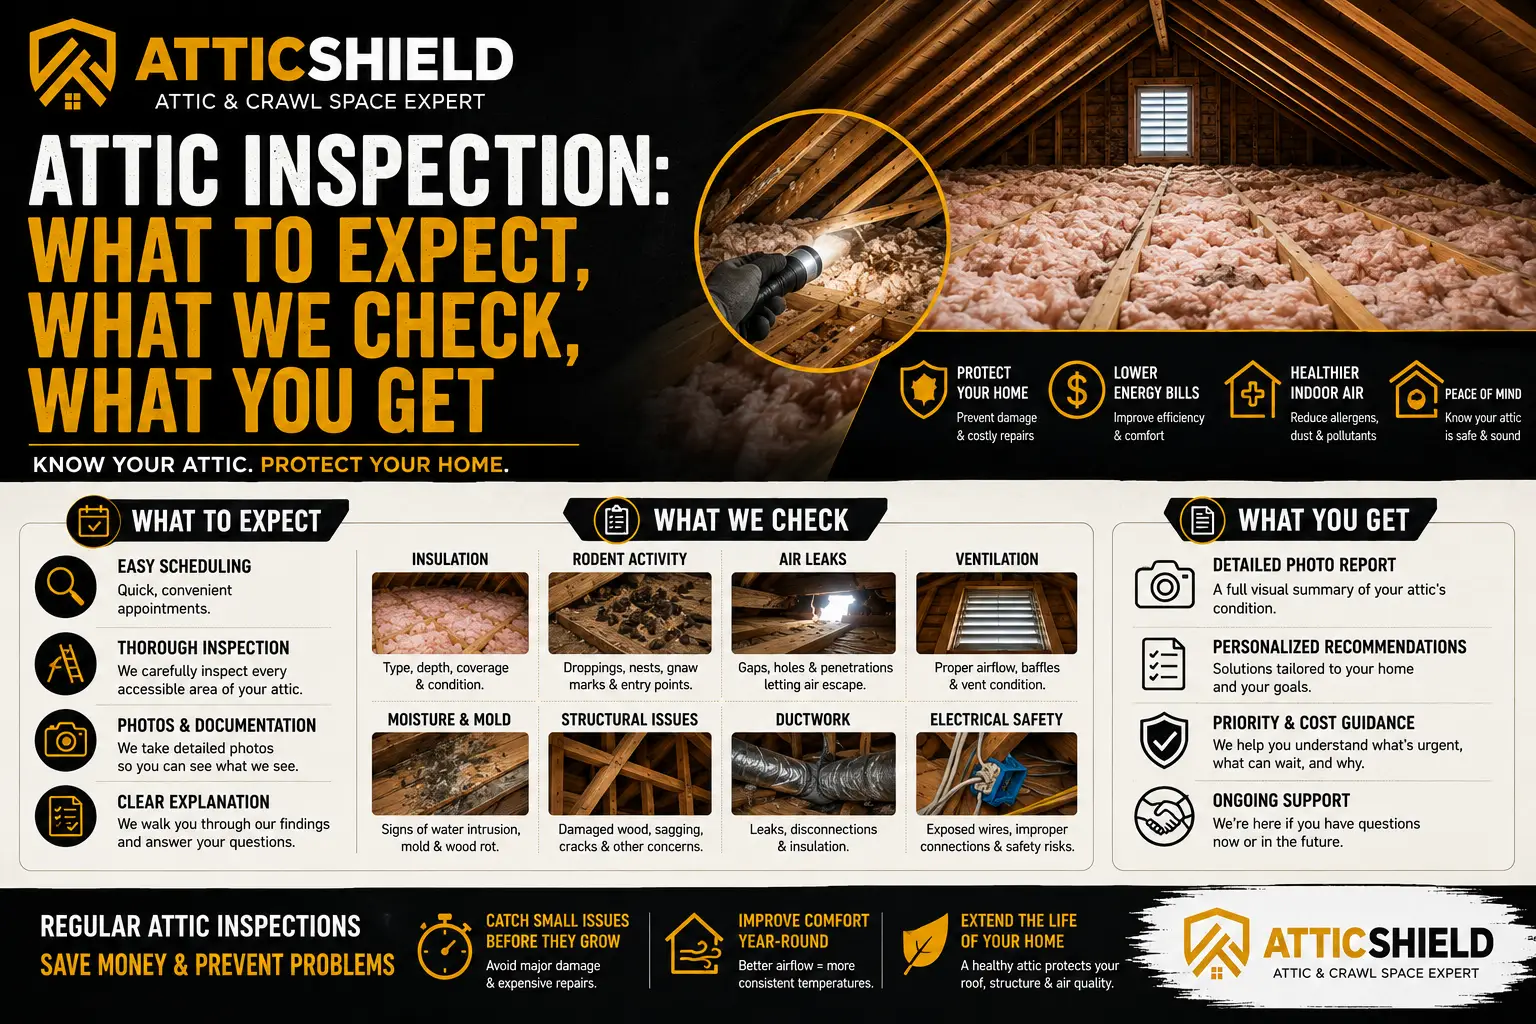
A free attic inspection sounds simple — someone looks in your attic and tells you what they see. But most homeowners have two reasonable hesitations: what exactly happens during it? and is “free inspection” just a doorway to a sales pitch? This guide answers both in complete detail: every point checked, what the photo documentation looks like, how long it takes, what you walk away with, and — importantly — how to tell a genuine attic inspection from a pressure-sales performance, whoever you end up calling.
Our position on that last part is simple: the more you know about what a real inspection involves, the better every contractor in the market has to behave. So here’s the whole process, nothing held back.

What’s in this guide
- Why attics get inspected at all
- Before the visit: what to expect
- The inspection itself, step by step
- The 30+ point checklist we run
- What you get afterward
- The three possible outcomes
- Inspection vs sales pitch: the red flags
- How to prepare (it’s almost nothing)
- Questions worth asking
- The annual inspection strategy
- When to book one
- Frequently asked questions
Why Attics Get Inspected at All
The attic is the least-visited room in the house and the one where the most expensive slow problems live. Insulation degrades invisibly. Rodents establish quietly. Moisture works in the dark. Ducts leak into space nobody occupies. None of it sends a notification — the first symptoms show up downstream as hot upstairs rooms, drifting energy bills, odd smells, or noises at night, usually months or years after the cause began.
An attic inspection is simply the act of collecting the information before it collects you. Everything about attic economics — the escalation curves we mapped in the cost of ignoring attic problems — favors whoever looks earliest.
Before the Visit: What to Expect
- Scheduling. You book a window that works for you — online or by phone at (858) 402-0066. Someone 18 or older needs to be home.
- Duration. Plan on roughly 45 minutes to an hour for a typical home — longer for large or complex attics, shorter when access is easy and the attic is healthy.
- Cost. Free means free: no trip charge, no “assessment fee,” no obligation attached to the report.
- Who shows up. A trained technician from a licensed contractor — you can verify our license (CSLB #1138021, C-2 and B) yourself at the Contractors State License Board before we ever arrive; our guide to checking a California contractor license takes five minutes.
The Attic Inspection Itself, Step by Step
Step 1 — The conversation (5 minutes)
What prompted the call: noises, a smell, a hot bedroom, a bill, a home sale, or plain curiosity. Your symptoms narrow the search the same way they would for a doctor — a 2 a.m. scratching sound and a chronically hot upstairs point the flashlight at different things first.
Step 2 — Protection and access (5 minutes)
Floor and access-area protection goes down before anyone goes up. The attic hatch area — closet, hallway, garage — gets covered so insulation dust stays out of your living space. If the hatch is buried under a closet shelf you never emptied, don’t worry about it; moving obstructions is part of the job.
Step 3 — The attic survey (20–35 minutes)
The technician physically enters the attic where safe access exists and works through the full checklist below, photographing as they go — the general condition, plus close-ups of anything notable. You stay comfortable downstairs; the attic in summer is no place for spectators, and the photos mean you miss nothing.
Step 4 — The exterior pass (5–10 minutes)
Rooflines, vents, and penetrations from outside; tree and fence access routes; anything a roof rat would call a commute. Interior evidence tells you something’s getting in — the exterior pass finds the doors.
Step 5 — The review, photos first (10–15 minutes)
You see your attic on a screen: what’s good, what’s marginal, what needs attention — each finding tied to a photo of your actual attic, not a stock image or a story. Then a written scope separates findings into now, can be bundled later, and fine as-is. Questions welcome; decisions not required on the spot.
The Attic Inspection Checklist: What Actually Gets Checked
| System | What we’re looking at | Why it matters |
|---|---|---|
| Insulation | Type, measured depth vs. Title 24 targets (R-38 ≈ 13.25″ blown fiberglass; we recommend R-44 ≈ 15″), coverage gaps, compaction, contamination, moisture history | The core of attic performance; decides replace vs top off |
| Rodent evidence | Droppings and their age, runways, tunneling, nests, grease marks, gnaw damage, odor | Determines whether exclusion and restoration are in scope — and how established the activity is |
| Entry points | Vent screens, roofline gaps, eave returns, penetrations — inside and out, to the ½-inch rat standard and ¼-inch mouse standard | The list that makes rodent proofing permanent instead of temporary |
| Air sealing | Condition of the ceiling plane: can lights, plumbing stacks, flues, top plates, the hatch itself; dirty-insulation streaks that map air movement | Sealing + insulation together average ~15% heating/cooling savings per EPA/ENERGY STAR estimates |
| Ventilation | Soffit intake open or buried, baffles present, exhaust type and rough balance, evidence of stagnation or condensation | The system that keeps the attic dry — details in our ventilation guide |
| Moisture | Staining on sheathing, rusty nail tips, matted insulation, musty odor, bath fans venting into the attic | The quiet escalation path — cheap at the source, expensive at stage three |
| Ducts | Visible condition: crushed runs, disconnections, failing tape joints, missing insulation, rodent damage | Attic duct leakage wastes cooling and pulls attic air toward your system — see duct repair & replacement |
| Electrical & hazards | Gnawed wiring, open junction boxes, stored combustibles near flues, vermiculite-type material flagged for testing | Safety findings get reported regardless of whether they’re our trade |
| Structure (visual) | Obvious sheathing or framing damage visible during the survey | Flagged for the appropriate trade when found |
Every finding is photographed. If a claim about your attic can’t be shown to you in a picture of your attic, treat it as unverified — that standard protects you with every contractor, including us.
What You Get Afterward
- The photo record of your attic’s current condition — yours to keep regardless of whether any work happens. Homeowners planning a sale find this documentation genuinely valuable later, as we covered in our guide for home sellers.
- A written scope, itemized and separated into what needs attention now, what can wait or be bundled, and what’s healthy. The separation is the honesty test — an inspection that puts everything in the “now” column isn’t an inspection.
- A real number, not a range — because pricing an attic accurately requires exactly the access, measurements, and condition assessment the inspection just performed. This is the answer to why we publish ranges online (see the cost guide) but only quote after inspecting: anyone quoting your attic without seeing it is guessing, in whichever direction benefits them.
- Time. The scope doesn’t expire at sunset. “Sign today” pricing is a pressure tactic, not a deadline — see the red flags below.
The Three Possible Outcomes of an Attic Inspection
Outcome 1 — “Your attic is fine.”
It happens regularly, and it’s a genuinely good visit: you get documentation that everything’s healthy, a baseline for the future, and the small stuff worth watching. No project. If a company’s inspections never produce this outcome, that tells you what the inspection actually was.
Outcome 2 — “A few things, none urgent.”
The most common result: insulation below modern depth but clean, a couple of vents worth screening, minor sealing opportunities. These bundle efficiently into one right-order project whenever you’re ready — the economics of doing them together are the whole logic of the seal-then-insulate sequence.
Outcome 3 — “There’s an active problem.”
Rodent activity, moisture, or significant contamination. You’ll see it in the photos, get the scope in the right order — removal, sanitization, exclusion, sealing, restoration — and understand which parts are urgent and why. Bad news delivered with evidence and a plan beats bad news discovered later at escalation prices, every time.
Attic Inspection vs Sales Pitch: the Red Flags
Use this list on everyone, including us. A legitimate inspection survives all six tests.
1. No photos, or stock photos. If the findings can’t be shown in pictures of your attic, they’re claims, not findings.
2. Everything is urgent. Real attics almost always have a “this is fine” column and a “can wait” column. A report with neither is a script.
3. Today-only pricing. Attic conditions don’t change by Thursday. Discounts that expire when the technician leaves exist to prevent comparison shopping.
4. A quote without an attic visit. Phone quotes and drive-by numbers ignore everything that actually determines cost — access, depth, contamination, ducts.
5. Vague or unverifiable licensing. Insulation work in California requires a C-2 classification. Thirty seconds on the CSLB site confirms or ends the conversation.
6. Fear over evidence. Health and fire risks in attics are real — the CDC’s rodent guidance is not marketing — but a professional shows you the specific evidence in your attic and lets it speak. Theater, urgency music, and “I’ve never seen it this bad” are sales tools.
How to Prepare (It’s Almost Nothing)
Before the visit
- Know where your attic access is — hallway, closet, or garage. That’s genuinely the main one.
- Note your symptoms: when the noises happen, which rooms run hot, when the smell appears. Timing details sharpen the search.
- Have a recent summer electric bill handy if energy cost is part of your question — year-over-year comparison beats any single month.
- Don’t clean anything up there. Evidence is information; per CDC guidance, disturbing droppings is also the one thing you shouldn’t do. Leave it exactly as-is.
- Prepare your questions. The review at the end is your time — use it.
Questions Worth Asking During the Review
The photo review at the end of an attic inspection is your time, and the right questions extract the most value from it — again, with any company:
- “Show me the worst thing you found, and the best.” Calibrates the whole report. An inspector who can’t name something healthy in your attic is grading on a curve you should distrust.
- “Which of these findings is actually urgent, and why?” The answer should reference compounding — rodents, moisture — versus linear items that can wait. If everything is urgent, nothing is credible.
- “What happens if I do nothing for a year?” A fair question with an honest answer for every finding: some cost you efficiency, some cost you escalation, some cost you nothing.
- “What order would you do this work in, and why that order?” Sequencing is where attic money is saved or wasted — sealing before insulating, exclusion before restoration. An inspector who can explain the order understands the work; one who can’t is reading a price sheet.
- “What measured depth did you find, and what’s the target?” Depth is a number, not an impression — you should hear inches and an R-value, the way our replacement guide lays them out.
- “Can I keep all the photos either way?” The answer should be an easy yes.
The Annual Attic Inspection as a Maintenance Strategy
One inspection answers today’s question. A yearly one changes the economics of owning the house, for one reason: every expensive attic problem was a cheap attic problem first, and the window between those two states is measured in months. An annual look — professionally, or the 15-minute homeowner version in the years between — is what keeps you buying stage-one fixes instead of stage-three restorations.
It also builds something subtle: a documented condition history. Photos from three consecutive years turn “is this water stain new?” from a guess into a comparison, and hand a future buyer’s inspector a story of maintenance instead of mystery — leverage we detailed in our home-seller’s guide. Spring is the ideal slot on the calendar: findings surface before the cooling season stresses them, and any work happens at comfortable attic temperatures.
When to Book an Attic Inspection
- On symptoms: night noises, odors from the hatch, a chronically hot upstairs, energy bills drifting up — each is the attic requesting a look.
- On events: after roof work, solar installation, or major storms — trades and weather create openings and displace insulation; before buying or listing a home, where documentation changes negotiations.
- On the calendar: annually is ideal, and spring specifically — problems get found before the cooling season stresses them, and any resulting work happens in comfortable attic temperatures rather than the July rush.
- On uncertainty: if you simply don’t know what’s up there — most homeowners don’t — a free inspection converts unknown to known at zero cost, and unknown is the only state with no good outcomes.
Frequently Asked Questions
Is a free attic inspection really free?
Yes — no trip charge, no assessment fee, no obligation. The business logic is straightforward: some inspections find work worth doing, and doing those jobs well is the business. The inspections that find healthy attics are the cost of being trustworthy on the ones that don’t.
How long does an attic inspection take?
Typically 45 minutes to an hour including the photo review — longer for large or complex attics.
Do I need to go into the attic with the inspector?
No, and in summer you shouldn’t — Southern California attics regularly exceed 140°F. The photo documentation exists precisely so you see everything from your kitchen table.
What if the inspection finds nothing wrong?
Then you’ve gained documentation of a healthy attic, a baseline for future comparison, and the answer to a question that was otherwise open — a genuinely good outcome we deliver regularly.
Will I get a quote at the inspection?
If work is warranted, yes — a written, itemized scope with real numbers, separated by urgency, that doesn’t expire the moment the truck leaves. If no work is warranted, you get that in writing instead.
How is this different from a home inspector’s attic check?
A general home inspection glances at the attic among a hundred other systems, typically from the hatch, in minutes. A dedicated attic inspection is the full survey above — measured depths, entry-point mapping, duct condition, photographed evidence — by people whose entire trade is what’s up there.
How should I choose who does it?
Verify the license first at the CSLB, then apply the six red-flag tests above during the visit. Any company that resents being checked has answered your question.
Book Yours This Week
Everything in this article reduces to one asymmetry: knowing what’s in your attic costs you an hour; not knowing has no fixed price. Whether the answer turns out to be “you’re fine,” “a few things when you’re ready,” or “let’s deal with this now,” every version beats the unknown — and every version comes with photos.
Free attic inspection, no obligation
About an hour. Full photo documentation. A written scope that separates now from later from never. Serving San Diego County, Southwest Riverside County, and South Orange County.
Request your free inspection or call (858) 402-0066Attic Shield is licensed, bonded, and insured. CSLB #1138021, C-2 and B classifications. See our full service area including San Diego, Escondido, Carlsbad, and Temecula.