


Attic insulation energy bills are one of the biggest hidden costs in most homes.
If your home feels too hot in summer, too cold in winter, or your HVAC seems to run nonstop, your attic is often the real culprit. In this guide, we’ll break down exactly how attic insulation reduces energy waste, how to estimate your real-world savings, and what to fix first so your insulation investment actually pays you back.
Pro tip: Savings don’t come from “more insulation” alone—insulation works best when air leaks and duct losses are addressed too.
Table of Contents
- Why the Attic Is Usually the #1 Money Leak
- How Attic Insulation Actually Lowers Energy Bills
- How Much You’ll Really Save (Realistic Ranges)
- A Simple “Back-of-the-Napkin” Savings Calculator
- What to Fix First: Air Sealing, Ducts, Rodent Damage
- Best Insulation Options for Southern California Homes
- The Attic Shield Process (Built for Results)
- FAQs
Why the Attic Is Usually the #1 Money Leak
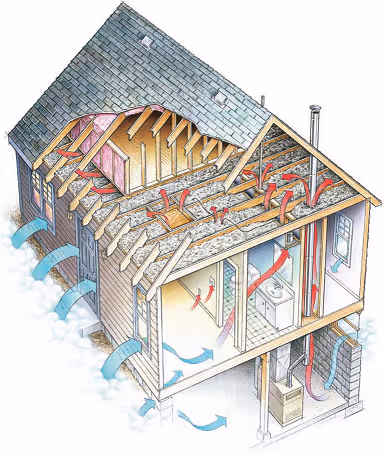
Most homeowners don’t “see” their attic every day, so it’s easy to assume it’s fine. But from an energy perspective, your attic is the front line between your living space and the harshest conditions your home experiences: blazing summer heat, cold winter nights, and constant airflow pressure trying to push conditioned air out of the house.
The U.S. Department of Energy explains that insulation provides resistance to heat flow—meaning it slows down the transfer of heat in and out of your home. When attic insulation is inadequate, heat moves more freely, and your HVAC system has to run longer and harder to keep your thermostat happy. That translates directly into higher monthly bills. (DOE overview: Energy Saver – Insulation).
The “Hot Roof / Hot Attic” reality
In Southern California, attic temperatures can climb far above outdoor temperatures. That heat doesn’t stay politely “up there.” It radiates downward into your ceiling drywall, warms the air inside your home, and forces your AC to fight a losing battle. If you’ve ever noticed upstairs rooms running hotter than downstairs, or your home never quite cooling down until late at night, attic heat transfer is often a major reason.
The stack effect: your home is a “chimney”
Warm air rises. That simple fact creates a powerful force called the stack effect. When your attic is under-insulated or full of air leaks, warm indoor air tends to rise and escape into the attic—especially in winter and during cooler nights when your heater runs. As conditioned air leaks out the top, outside air is pulled in from lower levels (crawl spaces, garages, gaps around plumbing and walls). Your system isn’t just heating/cooling your home—it’s also trying to heat/cool the outdoors.

How Attic Insulation Actually Lowers Energy Bills
Think of attic insulation as a thermal brake. Without it, heat moves quickly. With it, heat moves slowly—so your HVAC doesn’t have to constantly “re-win” the same temperature battle. But to understand your savings, you need to understand the three main ways homes lose energy: conduction, convection, and air leakage.
1) Conduction: heat moving through materials
Conduction is heat transfer through solids—like heat passing through your ceiling drywall. Insulation slows conduction by trapping tiny pockets of air (air is a poor conductor when it’s still). That’s what R-value represents: resistance to heat flow. Higher R-value = more resistance.
2) Convection: heat moving through air movement
Convection happens when air moves and carries heat with it. In many attics, insulation is uneven, thin, or disturbed—so hot air circulates above the ceiling and pushes heat into living areas. Even worse, gaps and penetrations allow direct air movement between attic and home.
3) Air leakage: the hidden energy drain
Air leakage is the “silent killer” of energy efficiency. Tiny gaps around recessed can lights, bath fans, plumbing penetrations, attic hatches, top plates, and wiring holes can add up to a massive combined leak area. ENERGY STAR emphasizes that sealing and insulating (together) can reduce energy waste and improve comfort, and provides guidance on how a well-sealed, well-insulated attic impacts bills.
This is why homeowners who “just add insulation” sometimes feel underwhelmed: if air is still leaking around the insulation, the insulation can’t do its job at full strength. That’s also why we often recommend pairing insulation upgrades with attic air sealing before or during installation.
Bottom line
Insulation slows heat transfer. Air sealing stops the shortcuts. When you combine both, your HVAC runs fewer hours, cycles more efficiently, and you feel more consistent comfort—often the same day the project is completed.
How Much You’ll Really Save (Realistic Ranges)
Let’s talk numbers—without hype. Your savings depend on your home’s starting point: how under-insulated you are today, how leaky the attic plane is, whether ducts are losing air, and how your HVAC is used. But there are credible benchmarks that help set expectations.
What ENERGY STAR estimates (average homes)
ENERGY STAR notes that homeowners can save an average of about 15% on heating and cooling costs (or about 11% on total energy costs) by sealing and insulating key areas like attics and floors. That’s an average across many home types and climates—some homes save less, and many underperforming homes save more.
What the U.S. Department of Energy says (insulation + air leaks)
A DOE “Guide to Home Insulation” explains that adding insulation to attics (and other key areas) and reducing unwanted air leaks can deliver meaningful savings on heating and cooling costs. This aligns with what we see in the field: the homes that benefit most are the ones with thin, damaged, or contaminated insulation and lots of leakage paths.
Real-world savings ranges we see most often
Here are realistic ranges for Southern California homeowners when attic insulation is upgraded correctly (and not sabotaged by leaks or duct issues):
- Modest improvement homes: 5%–10% reduction in heating/cooling costs (already decent insulation, fewer leaks).
- Typical under-insulated homes: 10%–20% reduction in heating/cooling costs (thin insulation, uneven coverage, common penetrations).
- High-waste homes: 20%+ reduction in heating/cooling costs (major air leaks, rodent-damaged insulation, duct leakage, big temp swings).
The key phrase is “done correctly.” If insulation is installed over rodent contamination, compressed in low spots, blocked at the hatch, or installed without sealing the obvious attic bypasses, you may not get the results you should. That’s why many projects benefit from a full attic “reset”—starting with attic cleaning, then (if needed) sanitization, followed by air sealing, and finally insulation installation.

A Simple “Back-of-the-Napkin” Savings Calculator
You don’t need perfect math to estimate whether attic insulation is worth it. You just need a reasonable range. Here’s a simple way to approximate your likely savings in under two minutes.
Step 1: Estimate your annual heating + cooling spend
Look at 12 months of utility bills and estimate what portion is heating/cooling. If you don’t want to dig that deep, use these quick heuristics:
- All-electric with heavy AC use: 40%–60% may be HVAC-related.
- Gas heat + electric AC: 30%–50% may be HVAC-related (varies by lifestyle and equipment).
- Mild HVAC use: 20%–35% may be HVAC-related.
Step 2: Apply a realistic savings percentage
If your attic is under-insulated and leaky, use 10%–20%. If it’s in rough condition (rodent damage, thin coverage, hot rooms, high runtime), use 15%–25%. ENERGY STAR’s “average” estimate for sealing + insulation is often cited around 15% on heating/cooling.
Step 3: Convert it into monthly “felt” savings
Annual savings ÷ 12 = your rough monthly savings. Your biggest improvements often show in peak months (hottest summer weeks and coldest winter nights).
Example scenarios
These are example ranges—not promises—but they show how the math works:
Scenario A: Typical under-insulated home
HVAC portion of bills: $1,800/year
Savings range: 10%–20%
Estimated savings: $180–$360/year (~$15–$30/month)
Often paired with air sealing for better results.
Scenario B: Hot rooms + high AC runtime
HVAC portion of bills: $3,000/year
Savings range: 15%–25%
Estimated savings: $450–$750/year (~$37–$62/month)
Common when insulation is thin/uneven and attic bypasses are leaking.
Scenario C: Rodent damage + duct losses
HVAC portion of bills: $3,600/year
Savings range: 15%–30%
Estimated savings: $540–$1,080/year (~$45–$90/month)
Often requires rodent proofing and duct repair/replacement.
What to Fix First So Your Savings Are Real
The fastest way to waste money is to install new insulation over problems that still leak energy (and often create health or odor issues). If you want the kind of savings people talk about, prioritize these items in order.
1) Attic air sealing: stop the shortcuts
Air sealing closes off the direct pathways where conditioned air escapes into the attic and where attic air gets pulled into the home. ENERGY STAR repeatedly stresses the benefit of sealing and insulating together for comfort and energy performance. At Attic Shield, our technicians focus on the high-impact zones—penetrations, top plates, duct chases, fan housings, and attic access points—so insulation can perform like it’s supposed to.
Learn more here: Attic Air Sealing.
2) Duct losses: don’t pay to cool your attic
Even with good insulation, leaky or damaged ducts can bleed cooled or heated air into the attic. That means your HVAC runs longer, your rooms feel uneven, and you “buy” comfort you never receive. If our inspection finds crushed, disconnected, torn, or heavily leaking duct sections, you may benefit from duct repair or replacement as part of an attic performance upgrade.
3) Rodent damage + contamination: reset the attic before you rebuild
Rodents tunnel through insulation, compress it, and create voids that behave like “open windows” in your thermal barrier. They also leave droppings and urine that can create odors and potential health concerns. If insulation is contaminated, it typically needs to be removed before installing new material. That’s why many homeowners start with attic cleaning, then (when needed) sanitization, and finally rodent proofing so the problem doesn’t return.

Best Insulation Options for Southern California Homes
The “best” insulation depends on your attic layout, existing conditions, and goals (pure energy savings vs. air quality + full attic restoration). ENERGY STAR provides guidance on attic insulation projects and emphasizes that the attic is one of the biggest opportunities to save energy. Here are the most common approaches homeowners choose:
Blown-in insulation (common for performance upgrades)
Blown-in insulation is excellent for achieving consistent coverage—especially when installed to the right depth and level. It fills irregular spaces, covers hard-to-reach areas, and can deliver strong performance when the attic floor is properly air sealed first. This is often a go-to option for homeowners focused on comfort, even temperatures, and reducing HVAC runtime.
Batt insulation (useful in specific layouts)
Batts can work well in open, accessible attics with consistent joist spacing and when installed carefully (no gaps, no compression, correct facing where applicable). The downside is that batts are easier to install incorrectly—small gaps and compression can reduce performance more than most homeowners realize.
Full removal + replacement (best for contaminated or failing insulation)
If your insulation is old, flattened, water-stained, smoke-impacted, or rodent-contaminated, the best value is often a full removal and replacement. Removal clears the attic so technicians can actually see and seal top plates, penetrations, and other leakage points—then rebuild the thermal barrier the right way. This approach also pairs naturally with attic sanitization and rodent proofing for a long-term solution.
Helpful external resources (supporter links)
- DOE: Insulation basics and why it lowers heating/cooling costs — energy.gov/energysaver/insulation
- ENERGY STAR: “Rule Your Attic” (sealing + insulating for comfort and savings) — energystar.gov/…/rule_your_attic
- ENERGY STAR: Methodology behind their estimated savings — energystar.gov/…/methodology
- DOE PDF: “Guide to Home Insulation” — Guide to Home Insulation (PDF)

The Attic Shield Process (Built for Results, Not Guesswork)
Every attic is different. That’s why the best insulation project starts with a real inspection—photos, measurements, and a plan that addresses the root cause. At Attic Shield, our technicians focus on the full system that drives your bills: insulation coverage, air leaks, contamination, rodent entry points, and duct losses.
- Inspection & documentation: We check insulation depth/condition, attic ventilation indicators, air leakage zones, and any signs of rodent activity. Then we document major findings with photos so you can see what’s happening.
- Clean and reset (when needed): If the attic has droppings, debris, or contamination, we may recommend attic cleaning and/or sanitization before rebuilding the insulation layer.
- Air sealing: We close off the high-impact bypasses so your conditioned air stays in your home and your insulation can actually perform. Learn more: Attic Air Sealing.
- Insulation installation: We install insulation to create consistent, even coverage across the attic floor—minimizing voids, thin spots, and compression. Learn more: Attic Insulation Installation.
- Duct evaluation (if applicable): If we see duct sections that are torn, leaking, crushed, or poorly supported, we’ll discuss options for restoring airflow and efficiency: Duct Repair & Replacement.
Want a real savings estimate for your home?
Request a free inspection and we’ll show you the biggest energy leaks, what to fix first, and what kind of improvement you can realistically expect.
FAQs: Attic Insulation Savings, Payback, and What Homeowners Miss
How fast does attic insulation pay for itself?
Payback depends on your starting condition. Homes with thin insulation, major air leaks, or duct losses often see the quickest payback because the energy waste is high. Homes that already have decent insulation may still benefit—but the payback period can be longer. The best way to know is an inspection that checks insulation depth, leakage points, and duct condition.
Is air sealing really necessary?
If your attic has bypasses (most do), air sealing can dramatically improve insulation performance. ENERGY STAR highlights savings from sealing and insulating together, because stopping airflow prevents your conditioned air from escaping and prevents hot attic air from being pulled into the home.
Why do some homes feel better immediately?
When insulation coverage becomes even and key leaks are sealed, you reduce heat gain/loss and drafts at the same time. Many homeowners notice fewer hot spots, improved upstairs comfort, and less HVAC runtime right away—especially during peak temperature hours.
Should I remove old insulation or add more on top?
If old insulation is clean, dry, and not heavily compressed, adding insulation can be a valid approach. But if it’s contaminated, damaged, water-stained, or rodent-impacted, removal is usually the safer “reset” so the attic can be sealed and rebuilt correctly. If you’re unsure, start with a free inspection.
What’s the best next step?
Use a professional inspection to identify your biggest energy drains—insulation depth, air bypasses, duct losses, and any contamination or rodent entry points. Then prioritize: air sealing + insulation (and duct/rodent solutions if needed). You can start here: Request an inspection.
Where can I read more about sealing & insulating?
ENERGY STAR’s attic guidance is a solid starting point for homeowners who want to understand the “why” behind the work: Rule Your Attic.
Ready to lower your energy bills the right way?
Get a free attic inspection and a clear plan—air sealing, insulation, and any supporting repairs—so your upgrade actually delivers measurable comfort and savings.
Request My Free InspectionEducational content only. Actual savings vary based on home condition, HVAC efficiency, usage habits, weather, and existing insulation/air leakage levels. For authoritative guidance, see DOE and ENERGY STAR resources linked above.


